crocheted belt for all occasions
Hi there! I haven't gotten around to posting a number of the tutorials out here so today is the day to get them rolling!
 Today's pattern is a very basic and simple thing that can become LOTS of other things!
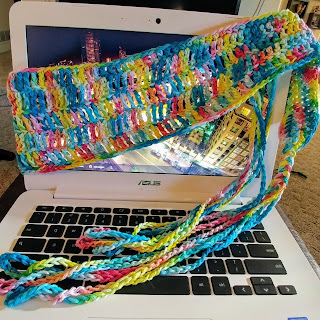
 A crochet festival belt... or fairy belt... or utility belt... or every day belt...
This project takes a couple of hours from start to finish and I will include a separate post later with the different bags and accessories.


 What you will need:
worsted weight cotton yarn* in whatever colors you might like (shown here is my circus circumstance yarn dyed on premier home cotton)
a 5.5 or 6mm crochet hook (6mm will make your belt bigger than the one shown here)
scissors
a yarn needle or darning needle
a stitch marker or piece of yarn to use as one
the hip measurements of the person who will be wearing the belt
Abbreviations:
terms are in American crochet
ch = chain
sc = single crochet
hdc = half double crochet
dc = double crochet
tc = treble or triple crochet
sl = slip stitch
(#) = number of stitches in the row
Notes:
-this project is worked in rows, and is made from a foundation chain - you are asked to work the first row in the "back hump of the chain" which creates a smoother nicer top edge of the belt (see photo above BASIC SIZES)
-this pattern is very basic and grows on an even count of 5's.
-how you embellish your belt is entirely up to you... this pattern is for the basic belt. once you have made one you will be able to see ways that you can change the pattern. please do. please also post pictures on the facebook group or here in comments so that we can all see!
-trust me... row one looks scary and it isn't. trust me. it will make sense when you complete the row!
-the ch 1 at the start of each row is the first stitch


BASIC HIP SIZES:
These hip measurements are REALLY basic... it is really easiest to have your recipient measure their hip at the place where they want to wear the belt and then chain and measure your chain slightly stretched until you have the right length... some of us belt at the waist and some of us belt low... these are just suggested ranges for current fashion sizes (note that the classic "perfect hip for the perfect hourglass figure" is only a medium according to manufacturers!)
S = 34-36" roughly 100 chains on 5.5mm hook
M = 37-38" roughly 110 chains on 5.5mm hook
L = 39-40" roughly 120 chains on a 5.5mm hook
XL = 41-44" roughly 130 chains on a 5.5mm hook
1X = 46-49" roughly 140 chains on a 5.5mm hook
2X = 50-53" roughly 150 chains on a 5.5mm hook
3X = 54-56" roughly 160 chains on a 5.5mm hook
Crocheted Belt for All Occasions:
(this pattern makes a large belt)
Row 1:
ch 100 and join to first ch
ch 119 and place a stitch marker (join of ch 100 is the first stitch of your 120)
ch 100 and join to stitch with stitch marker
work sc back along the row in the back hump of the chain (see photos above) counting where you joined ch as 1 and the last stitch is where you joined the first ch at the beginning
(120)
YOU DID THE TRICKY BIT... YAY YOU!
ch 1 and turn
Row 2:
sc 15 (ch 1 counts as 1st of 15), hdc 15, dc 15, tc 30, dc 15, hdc 15, sc 15, ch 100 and join back to last stitch of the belt (join counts as first stitch of Row 3)
(120)
Row 3:
sc 15 (join of ch 100 counts as 1st of 15), hdc 10, dc 10, tc 50, dc 10, hdc 10, sc 15, ch 100 and join back to last stitch of the belt (join counts as first stitch of Row 4)
(120)
Row 4:
sc 15 (join of ch 100 counts as the 1st of 15), hdc 5, dc 10, tc 60, dc 10, hdc 5, sc 15, ch 100 and join back to last stitch of the belt (join counts as first stitch of Row 5)
Row 5:
sc 15 (join of ch 100 counts as the 1st of 15), hdc 5, dc 10, tc 60, dc 10, hdc 5, sc 15, ch 100 and join back to last stitch of the belt.
finish off and sew in ends
Adjustments, Embellishments and Alterations:
the belt is adjustable BIGGER than you made it because of the ties
you can add or subtract rows, change the curve of the wider point by adding fewer treble crochet in the middle on each row and replacing them with sc, hdc or dc in the other sections
I braid the ties together to add stability and because it makes it easier to tie the belt. They are also gorgeous left individual and tied in pairs so that there are more bows.
I add beads and other embellishment to the ties and to the body of the belt.
I also add netting to widen the belt and give it more of a gypsy feel by making rows of chains tied in with slip stitches in each chain loop of the row before.
If you have gone a little too big it is possible to weave a sturdy satin ribbon or other cloth through the stitches using a large hole needle and add a couple of rows of tighter less stretchy ties to make the belt adjustable. And prettier... who doesn't like MORE dangly ribbony pretty bits?
* I use cotton because it doesn't give as much, is friendlier for washing and tends not to be pulled out of shape by frequent wear. Premier Home Cotton is a workhorse... strong, durable and made to be used to make washcloths and other household products. I have made this belt using other materials and find that it is stretchier and lighter. Fair Isle Liberty weight yarns are vibrant, flexible and make pretty belts... please take into account using acrylic or wool yarns that they have more give than cotton and your belt may require ribbon or other stabilizing fabric that is less stretchy to keep a reliable size.


This project takes a couple of hours from start to finish and I will include a separate post later with the different bags and accessories.

by adding ties or straps to bags the belt becomes a utility belt
this one also has some lacy netting that hugs the curves
(made by chaining and slip stitching into chain loop from previous row)

beads and embellishments on pockets makes them more personal and fun

worsted weight cotton yarn* in whatever colors you might like (shown here is my circus circumstance yarn dyed on premier home cotton)
a 5.5 or 6mm crochet hook (6mm will make your belt bigger than the one shown here)
scissors
a yarn needle or darning needle
a stitch marker or piece of yarn to use as one
the hip measurements of the person who will be wearing the belt
Abbreviations:
terms are in American crochet
ch = chain
sc = single crochet
hdc = half double crochet
dc = double crochet
tc = treble or triple crochet
sl = slip stitch
(#) = number of stitches in the row
Notes:
-this project is worked in rows, and is made from a foundation chain - you are asked to work the first row in the "back hump of the chain" which creates a smoother nicer top edge of the belt (see photo above BASIC SIZES)
-this pattern is very basic and grows on an even count of 5's.
-how you embellish your belt is entirely up to you... this pattern is for the basic belt. once you have made one you will be able to see ways that you can change the pattern. please do. please also post pictures on the facebook group or here in comments so that we can all see!
-trust me... row one looks scary and it isn't. trust me. it will make sense when you complete the row!
-the ch 1 at the start of each row is the first stitch


BASIC HIP SIZES:
These hip measurements are REALLY basic... it is really easiest to have your recipient measure their hip at the place where they want to wear the belt and then chain and measure your chain slightly stretched until you have the right length... some of us belt at the waist and some of us belt low... these are just suggested ranges for current fashion sizes (note that the classic "perfect hip for the perfect hourglass figure" is only a medium according to manufacturers!)
S = 34-36" roughly 100 chains on 5.5mm hook
M = 37-38" roughly 110 chains on 5.5mm hook
L = 39-40" roughly 120 chains on a 5.5mm hook
XL = 41-44" roughly 130 chains on a 5.5mm hook
1X = 46-49" roughly 140 chains on a 5.5mm hook
2X = 50-53" roughly 150 chains on a 5.5mm hook
3X = 54-56" roughly 160 chains on a 5.5mm hook
Crocheted Belt for All Occasions:
(this pattern makes a large belt)
Row 1:
ch 100 and join to first ch
ch 119 and place a stitch marker (join of ch 100 is the first stitch of your 120)
ch 100 and join to stitch with stitch marker
work sc back along the row in the back hump of the chain (see photos above) counting where you joined ch as 1 and the last stitch is where you joined the first ch at the beginning
(120)
YOU DID THE TRICKY BIT... YAY YOU!
ch 1 and turn
Row 2:
sc 15 (ch 1 counts as 1st of 15), hdc 15, dc 15, tc 30, dc 15, hdc 15, sc 15, ch 100 and join back to last stitch of the belt (join counts as first stitch of Row 3)
(120)
Row 3:
sc 15 (join of ch 100 counts as 1st of 15), hdc 10, dc 10, tc 50, dc 10, hdc 10, sc 15, ch 100 and join back to last stitch of the belt (join counts as first stitch of Row 4)
(120)
Row 4:
sc 15 (join of ch 100 counts as the 1st of 15), hdc 5, dc 10, tc 60, dc 10, hdc 5, sc 15, ch 100 and join back to last stitch of the belt (join counts as first stitch of Row 5)
Row 5:
sc 15 (join of ch 100 counts as the 1st of 15), hdc 5, dc 10, tc 60, dc 10, hdc 5, sc 15, ch 100 and join back to last stitch of the belt.
finish off and sew in ends
Adjustments, Embellishments and Alterations:
the belt is adjustable BIGGER than you made it because of the ties
you can add or subtract rows, change the curve of the wider point by adding fewer treble crochet in the middle on each row and replacing them with sc, hdc or dc in the other sections
I braid the ties together to add stability and because it makes it easier to tie the belt. They are also gorgeous left individual and tied in pairs so that there are more bows.
I add beads and other embellishment to the ties and to the body of the belt.
I also add netting to widen the belt and give it more of a gypsy feel by making rows of chains tied in with slip stitches in each chain loop of the row before.
If you have gone a little too big it is possible to weave a sturdy satin ribbon or other cloth through the stitches using a large hole needle and add a couple of rows of tighter less stretchy ties to make the belt adjustable. And prettier... who doesn't like MORE dangly ribbony pretty bits?
* I use cotton because it doesn't give as much, is friendlier for washing and tends not to be pulled out of shape by frequent wear. Premier Home Cotton is a workhorse... strong, durable and made to be used to make washcloths and other household products. I have made this belt using other materials and find that it is stretchier and lighter. Fair Isle Liberty weight yarns are vibrant, flexible and make pretty belts... please take into account using acrylic or wool yarns that they have more give than cotton and your belt may require ribbon or other stabilizing fabric that is less stretchy to keep a reliable size.

this "medium" belt and pouch uses about 1/2 of a tin of Fair Isle Liberty Craft in Neon Lights
and pattern is available elsewhere with pocket


Comments
Post a Comment