Lurvkin Accessories
My little Lurvkins now have an accessory line... to begin with lets make sure they're ready to head out to assist you on the road... glasses and jewelry will be another post... for now... travel accessories!
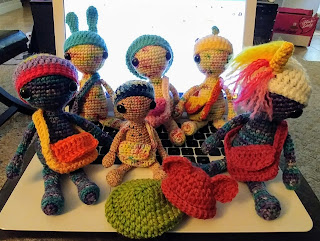
Slouchy Beanie Hat
Round 1: 6 hdc in a m/c - draw tight and sew in after row 2 (6)
Round 2: inc in each stitch around (12)
Round 3: hdc and inc around (18)
Round 4: 2 hdc and inc around (24)
Rounds 5-7: hdc in each around (24)
Rounds 8-10: sc in each around (24) and f/o and sew in end
To make this hat fit more closely to your doll's head reduce the number of rounds... 2 rows instead of 3 of hdc and only 1 row of sc... or however you would like to do it.
You can add ears in many shapes.
Mouse/Bear/Monkey ears are as follows: sc 6 in m/c and do not join, ch 1 and turn, inc in each sc around and f/o leaving tail to sew on... by not closing the m/c or sealing the ends you can pull your circle out to be a half circle and stitch it down to the hat.
Messenger Bag
Strap:
Row 1: ch 35 and dc your way back along the chain starting from the 4th ch from hook
f/o and leave long tail to attach to body of bag
Body of Bag:
Row 1: ch 13 and dc your way back along the chain starting from the 4th ch from hook (10) ch 2 and turn
Rows 2-8: 9 dc (10) ch 2 and turn
f/o and sew in ends
Assembly:
the strap also forms the sides of the bag
row 3 of the bag is the "bottom" of the bag
rows 6-8 form the top and flap of the bag
line up the width of the strap (1 double crochet wide) with row 3 of the bag - right sides facing out
stitch the edges of the strap edge to the edges of 2 rows (on one side this is the only 2 rows and on the other there should be 5 more rows) - repeat for the other side
it's really that easy.
yeah. promise.
:D

What You Will Need:
The same weight yarn you used to make your mini in whatever colors you want
a crochet hook the same size or 1/2 size larger than the one used to make your mini
a darning needle or yarn needle
scissors
a mini or other doll to put your accessories on
I use yarns that I have dyed, and yarns dyed by the incredibly amazing Christina of Colour Redefined and Stephani of Camelot Dyeworks who do voodoo and other mystical things to yarn and make it so gorgeous that you have to buy more and more and more... maybe that's just me. I love the color, the technique and the prices that these women offer for their masterpieces.
Abbreviations:
ch = chain
m/c = magic circle
sl = slip stitch
sc = single crochet
hdc = half double crochet
dc = double crochet
inc = increase, 2 stitches in the place of one
dec = decrease, 2 stitches worked together
f/o = finish off (I do this by slip stitching)
(#) = number of stitches in the row
Notes:
-I find the best way to keep scale for your dolls is to use the same weight yarn and the same size hook you used to make the doll or 1/2 a mm higher... for instance, I made my sock yarn mini's using a 3mm hook and the accessories with a 3.5mm hook and the same weight yarn.
-the sky is the limit... as you can see here, I've made ears for hats... made the beanies tighter or looser or longer or shorter... you can do what you want with your hats!
Ok... so lets get started.
Round 1: 6 hdc in a m/c - draw tight and sew in after row 2 (6)
Round 2: inc in each stitch around (12)
Round 3: hdc and inc around (18)
Round 4: 2 hdc and inc around (24)
Rounds 5-7: hdc in each around (24)
Rounds 8-10: sc in each around (24) and f/o and sew in end
To make this hat fit more closely to your doll's head reduce the number of rounds... 2 rows instead of 3 of hdc and only 1 row of sc... or however you would like to do it.
You can add ears in many shapes.
Mouse/Bear/Monkey ears are as follows: sc 6 in m/c and do not join, ch 1 and turn, inc in each sc around and f/o leaving tail to sew on... by not closing the m/c or sealing the ends you can pull your circle out to be a half circle and stitch it down to the hat.
Messenger Bag
Strap:
Row 1: ch 35 and dc your way back along the chain starting from the 4th ch from hook
f/o and leave long tail to attach to body of bag
Body of Bag:
Row 1: ch 13 and dc your way back along the chain starting from the 4th ch from hook (10) ch 2 and turn
Rows 2-8: 9 dc (10) ch 2 and turn
f/o and sew in ends
Assembly:
the strap also forms the sides of the bag
row 3 of the bag is the "bottom" of the bag
rows 6-8 form the top and flap of the bag
line up the width of the strap (1 double crochet wide) with row 3 of the bag - right sides facing out
stitch the edges of the strap edge to the edges of 2 rows (on one side this is the only 2 rows and on the other there should be 5 more rows) - repeat for the other side
it's really that easy.
yeah. promise.
:D


Comments
Post a Comment