super simple gorgeous throw
and it can be SOOOOOO many more things...
shawl... blanket... scarf... bedspread...
Supplies

 Honestly... anything? That's not entirely true. This is a great stash buster if you have ends of skeins. This makes a beautiful way to show off self striping yarn cakes, leftover sock yarns, or mini skeins of sock yarn that you buy for it on purpose.
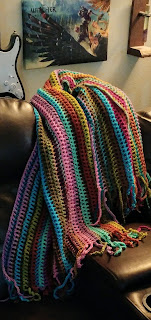
For the one pictured above I used Premier Sweet Roll in 4 colors and a skein of Deborah Norville Everyday yarn. 1160 yards, give or take, since I have a mini ball to add to the next scrappy project.
For one of the projects you can see pictured below in examples I am using sock yarn mini's from a friend who is loving the learning process of dyeing her own yarns and is jazzed by the idea that I'm making my mama a lap blanket that can double as a shawl from her gorgeous creations.
For the other project you see below I used up yarn ends and scraps of Fair Isle Yarn Liberty acrylic. (pictured in the bag above)
I just ordered some bulky yarns in different weights and textures from Fair Isle Yarns to make a fluffy girly pink based blanket that I will mix some bobble stitches and other fun funky stuff into. Faux fur, chunky regular yarns and wavy bobbly textured variegated chunky yarn. It's gonna be really fun!
SO... for your first one...
1200 yards of worsted weight yarns in whatever colors you like.
5.5mm crochet hook (this is the most often recommended hook size for worsted weight yarn)
scissors
2 stitch markers (you do need these for about 10 or 15 minutes)
Abbreviations
CH = Chain
SK = Skip number of stitches advised in the pattern
DC = Double Crochet
F/O = Finish Off (you're doing this every time you end the chain by pulling the end through the loop like a knot)
Notes

Super Simple Gorgeous Throw
Row 1: CH 25, add stitch marker, CH 201, add stitch marker, CH 25 and F/O
Row 2: CH 25, begin in stitch with stitch marker and DC then CH 1 and SK 1 CH and DC and CH 1 in the next CH and repeat across. You should end with a DC in the CH where your stitch marker is. CH 25 and F/O
Now... I marked this side of my project as the "front" so that I wouldn't lose track. You don't have to.
Rows 3-60: Turn. CH 25, begin in top of 1st DC of previous row, DC and CH 1 and work in the top of each DC across to the last DC. CH 25 and F/O


Gorgeous, builds up fast and NO SEWING IN YOUR ENDS!!!
Enjoy
shawl... blanket... scarf... bedspread...

Supplies


For the one pictured above I used Premier Sweet Roll in 4 colors and a skein of Deborah Norville Everyday yarn. 1160 yards, give or take, since I have a mini ball to add to the next scrappy project.
For one of the projects you can see pictured below in examples I am using sock yarn mini's from a friend who is loving the learning process of dyeing her own yarns and is jazzed by the idea that I'm making my mama a lap blanket that can double as a shawl from her gorgeous creations.
For the other project you see below I used up yarn ends and scraps of Fair Isle Yarn Liberty acrylic. (pictured in the bag above)
I just ordered some bulky yarns in different weights and textures from Fair Isle Yarns to make a fluffy girly pink based blanket that I will mix some bobble stitches and other fun funky stuff into. Faux fur, chunky regular yarns and wavy bobbly textured variegated chunky yarn. It's gonna be really fun!
SO... for your first one...
1200 yards of worsted weight yarns in whatever colors you like.
5.5mm crochet hook (this is the most often recommended hook size for worsted weight yarn)
scissors
2 stitch markers (you do need these for about 10 or 15 minutes)
Abbreviations
CH = Chain
SK = Skip number of stitches advised in the pattern
DC = Double Crochet
F/O = Finish Off (you're doing this every time you end the chain by pulling the end through the loop like a knot)
Notes
- Your tension may differ from mine. This throw is 5' 6" long and 3' 2" wide. I honestly just chained until the chain was just a little longer than my arm span, making sure to hold the stitch marker that I used to mark where the fringe ended and the body of the shawl/blanket/throw begins. Make sure you chain an uneven number before you begin your fringe again and you'll be golden.
- The odder your color choices the more stunning the stripes will be, and I highly recommend at least one color that's a variegated colorway, so that the stripes aren't static. I used Pop Wasabi, Raspberry Swirl, Root Beer Pop and Frosty Swirl Sweet Roll yarns and Deborah Norville Everyday in Northern Lights... these aren't exactly matchy matchy colors and I feel like the final result is richer and more beautiful in it than if I'd carefully chosen colors that exactly complimented each other.
- Turning between the rows seems to feed the look of this stitch much more than NOT turning... I can't explain it better, the textures just flow a little better. You may disagree and can make yours facing all one way if you choose, then you have a clear front and back.

Super Simple Gorgeous Throw
Row 1: CH 25, add stitch marker, CH 201, add stitch marker, CH 25 and F/O
Row 2: CH 25, begin in stitch with stitch marker and DC then CH 1 and SK 1 CH and DC and CH 1 in the next CH and repeat across. You should end with a DC in the CH where your stitch marker is. CH 25 and F/O
Now... I marked this side of my project as the "front" so that I wouldn't lose track. You don't have to.
Rows 3-60: Turn. CH 25, begin in top of 1st DC of previous row, DC and CH 1 and work in the top of each DC across to the last DC. CH 25 and F/O

stitch marker

Begin at first stitch marker, leaving fringe out at the side.

DC, CH 1 and SK 1 across the foundation chain only.
That's honestly it. LOLGorgeous, builds up fast and NO SEWING IN YOUR ENDS!!!
Enjoy


Comments
Post a Comment